Source: Reprinted from https://community.milkv.io/t/opensbi/681, Original Author Judehahh
Previously, in the article Bootstrapping Your Own Operating System with U-Boot, I attempted to use OpenSBI to bootstrap my own operating system. However, I found that there were formatting requirements for the bl33 image, both when creating the FIP (Firmware Image Package) and during ATF (Arm Trusted Firmware) startup.
During this period, I delved into RISC-V assembly and linker scripts, and then reexamined the code of ATF and U-Boot. I realized that creating my own bl33 image is actually quite simple. All that is needed is to include the following information at the beginning of the program:
_start:
	/* BL33 information */
	j real_start
	.balign 4
	.word 0x33334c42  /* b'BL33' */
	.word 0xdeadbeea  /* CKSUM */
	.word 0xdeadbeeb  /* SIZE */
	.quad 0x80200000  /* RUNADDR */
	.word 0xdeadbeec
	.balign 4
	j real_start
	.balign 4
	/* BL33 end */
Here is a simple example:
If you haven’t compiled the SDK before, you need to compile the FSBL (First Stage Bootloader) to obtain the bl2 image:
export MILKV_BOARD=milkv-duo
source milkv/boardconfig-milkv-duo.sh

source build/milkvsetup.sh
defconfig cv1800b_milkv_duo_sd

build_fsbl
Then, write a simple program that uses uart8250 to print a string:
#define UART0_THR 0x04140000
#define UART0_LSR 0x04140014

	.section .text
	.global _start
_start:
	/* BL33 information */
	j real_start
	.balign 4
	.word 0x33334c42  /* b'BL33' */
	.word 0xdeadbeea  /* CKSUM */
	.word 0xdeadbeeb  /* SIZE */
	.quad 0x80200000  /* RUNADDR */
	.word 0xdeadbeec
	.balign 4
	j real_start
	.balign 4
	/* Information end */

real_start:
	la s0, str
1:
	lbu a0, (s0)
	beqz a0, exit
	jal ra, uart_send
	addi s0, s0, 1
	j 1b

exit:
	j exit

uart_send:
	/* Wait for tx idle */
	li t0, UART0_LSR
	lw t1, (t0)
	andi t1, t1, 0x20
	beqz t1, uart_send
	/* Send a char */
	li t0, UART0_THR
	sw a0, (t0)
	ret

.section .rodata
str:
	.asciz "Hello Milkv-duo!\n"
Compile:
riscv64-unknown-elf-gcc -nostdlib -fno-builtin -march=rv64gc -mabi=lp64f -g -Wall -Ttext=0x80200000 -o bl33.elf start.S

riscv64-unknown-elf-objcopy -O binary bl33.elf bl33.bin
You can now use hd to examine the generated bin file, and you will notice that there are two lines of data for verification, while OpenSBI will actually jump to 0x80200020 to execute our program.
00000000  05 a0 01 00 42 4c 33 33  ea be ad de eb be ad de  |....BL33........|
00000010  00 00 20 80 00 00 00 00  ec be ad de 11 a0 01 00  |.. .............|
Go to the fsbl directory to generate the fip.bin file:
cd fsbl/

./plat/cv180x/fiptool.py -v genfip \
    'build/cv1800b_milkv_duo_sd/fip.bin' \
    --MONITOR_RUNADDR="0x0000000080000000" \
    --CHIP_CONF='build/cv1800b_milkv_duo_sd/chip_conf.bin' \
    --NOR_INFO='FFFFFFFFFFFFFFFFFFFFFFFFFFFFFFFFFFFFFFFFFFFFFFFFFFFFFFFFFFFFFFFFFFFFFFFF' \
    --NAND_INFO='00000000'\
    --BL2='build/cv1800b_milkv_duo_sd/bl2.bin' \
    --DDR_PARAM='test/cv181x/ddr_param.bin' \
    --MONITOR='../opensbi/build/platform/generic/firmware/fw_dynamic.bin' \
    --LOADER_2ND='/path/to/bl33.bin' \
    --compress='lzma'
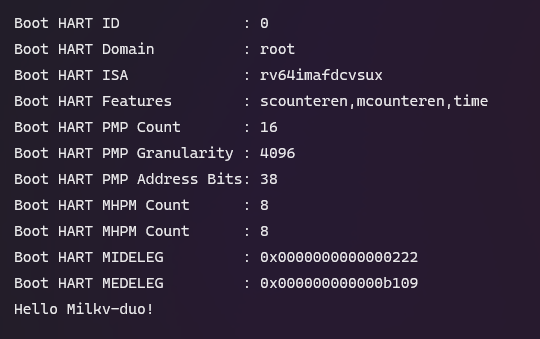
Finally, place the fip.bin file on the TF card, connect to the board’s serial port with a baud rate of 128000, and you will be able to see our print information.