Citation of the Following Tutorials:
Section 1: Milk-V Duo Image Writing Tutorial
Open the Win32DiskImager software, select the image file, choose the device, and click “Write.”

Upon successful writing, the USB drive can be ejected.

Insert the SD card into the slot of the MILKV DUO development board, power it via USB 5V, wait for about 5 seconds, and the blue system running indicator will blink, indicating that the system is running normally.

Section 2: Milk-V Duo USB (RNDIS) Terminal Access
Usb virtual rndis network card login system - Duo - MilkV Community
1. Updating RNDIS Drivers:
After burning the image, connect one end of the USB to your computer and the other end to the MILKV DUO core board. When the core board’s system indicator light blinks, check the computer’s Device Manager. You will see the RNDIS option under “Other devices.”

Right-click on RNDIS and choose “Update driver.”

select “Browse my computer for driver software.”

Choose “Let me pick from a list of available drivers on my computer.”

Scroll down and select “Network adapters.”

Under the Manufacturer column, choose “Microsoft,” and under the Model column, select “Remote NDIS Compatible Device.”

Finally, when the “Update Driver Warning” appears, select “Yes” to complete the RNDIS driver update.

After updating the RNDIS driver, a new device named “Remote NDIS Compatible Device” will appear under the Network adapters section, indicating that the RNDIS driver has been successfully updated.

**2.Using SSH Terminal to Remotely Connect to the MILKV DUO Core Board (Using PuTTY as an Example): **
Enter “Host Name” as 192.168.42.1 (this ID is fixed), and choose Port 22.

login as:root
password:milkv

Section 3: MILKV UART Serial Login
Set up the working environment | Milk-V
1.Hardware Connection
The pins of the USB to TTL (USB Serial Device) cable are defined as follows:

Connect the USB to TTL serial cable to the MilkV Duo development board as shown below (do not connect the red wire):
| Milk-V Dou | <---> | USB to TTL |
| TX (pin 16) | <---> | RXD |
| RX (pin 17) | <---> | TXD |
| GND (pin 18) | <---> | GND |


After connecting the serial communication device to the computer, the corresponding device name and port name (in this case, COM15) will be displayed in the Device Manager.

Use remote access software (PuTTY is used here) and select Serial. Choose the port number corresponding to the serial communication device (COM15) and set the speed to 115200.

When the Duo development board boots, it will print system status information, and you will eventually see the command-line interface. This indicates successful serial login.

The default serial settings for Duo u-boot and the kernel console are as follows:
| baudrate: | 115200 |
| data bit: | 8 |
| stop bit: | 1 |
| parity: | none |
| flow control: | none |
Please note! If you attempt to use serial login while the development board is powered on, it is likely to cause the console login software to remain in a blocked state. It is recommended to first use remote access software to establish a serial login (which will initially enter a blocked state) while the development board is completely powered off (i.e., both the Duo development board’s power and the USB to TTL connection to the Duo development board’s pins are disconnected). Then, power up the Duo development board and subsequently connect the USB to TTL device to the TXD, RXD, and GND pins on the Duo development board to enable serial login functionality.
Please note! When using serial login, you should power on the DUO development board before connecting the USB to TTL device, as the TXD pin of the USB to TTL device carries electrical signals. If you connect the serial pins first and then power on the DUO development board, the voltage level on the TXD pin may cause the chip to operate at a low voltage, which could lead to erratic timing in the chip’s serial interface, preventing normal use of the USB to TTL device and causing the remote access tool to remain in a blocked state.
Section 4: Kernel Compilation
Building Development Environment for milk-v duo (CV1800B, C906 Kernel)
Local environment: Windows 11 64-bit
Compilation environment: VMware Ubuntu 22.04.4.2 LTS
Prepare an SD card (16GB).
One Milk-V Duo board
1. Configuring the Development Environment:
Install dependencies:
sudo apt-get update
sudo apt install dialog python3-dev make git bc gcc flex bison ninja-build libssl-dev rsync pkg-config device-tree-compiler squashfs-tools parted dosfstools
Install cmake:
sudo apt-get install cmake
Create a development environment directory:
mkdir duo && cd duo
Download the development package cvi_mmf_sdk.zip:
wget -c https://codeload.github.com/sophgo/cvi_mmf_sdk/zip/refs/heads/v4.1.0 -O cvi_mmf_sdk.zip
Then unzip it:
unzip cvi_mmf_sdk.zip

mv cvi_mmf_sdk-4.1.0/ cvi_mmf_sdk/
Download the toolchain:
wget https://sophon-file.sophon.cn/sophon-prod-s3/drive/23/03/07/16/host-tools.tar.gz
Then unzip it:
tar xvf host-tools.tar.gz
Move it to the development package:
mv host-tools/ cvi_mmf_sdk/
Start the compilation following these steps:
cd cvi_mmf_sdk/
source build/cvisetup.sh
defconfig cv1800b_sophpi_duo_sd
clean_all
build_all
pack_sd_image
Note: If the compilation process reports a missing libssl.so.1.1, proceed with the following installation.
wget http://security.ubuntu.com/ubuntu/pool/main/o/openssl/libssl1.1_1.1.1-1ubuntu2.1~18.04.23_amd64.deb

http://security.ubuntu.com/ubuntu/pool/main/o/openssl/libssl1.1_1.1.1-1ubuntu2.1~18.04.23_amd64.deb

(If the link is broken, you can download it manually from here http://security.ubuntu.com/ubuntu/pool/main/o/openssl/)

sudo dpkg -i libssl1.1_1.1.1-1ubuntu2.1_18.04.21_amd64.deb
After the compilation is complete, an “install” folder will be generated in the directory.
The directory structure of “install/soc_cv1800b_sophpi_duo_sd” is as follows:

2. Writing the System to the SD Card:
$ cd install/soc_cv1800b_sophpi_duo_sd/
$ sudo dd if=./sophpi-duo-*.img of=/dev/sdx bs=32M status=progress oflag=direct
3. Starting the System:
Insert the SD card into the board, connect it to the board’s UART 0 with a TTL serial connection (no power required), then open the serial debug tool on your computer. Connect the board to the computer using a TYPEC cable, and after a moment, the system should start.


Please note that this version of the kernel does not include the RNDIS protocol. Therefore, when you plug the DUO development board into USB, it won’t be recognized in the device manager on your computer.
Section 5: Controlling IO and Illuminating LEDs on milk-v duo (CV1800B, C906 Kernel):
milk-v duo (CV1800B, C906 Kernel) - Controlling IO and Illuminating LEDs
MILK V GPIO Control LED Tutorial
The milk-v duo features an onboard LED connected to XGPIOC24.
The GPIO-related modules are already built into the kernel, so there’s no need to execute loading commands.
You can perform input and output operations on GPIO by running GPIO read/write commands in the console or by writing GPIO read/write programs in kernel mode or user mode.
The XGPIOC group number is 416, so the GPIO number is 416+24=440.
After booting duo and entering the command line, enter the following commands:
bashCopy codeecho 440 > /sys/class/gpio/export                     # This creates the /sys/class/gpio/gpio440 directory
echo out > /sys/class/gpio/gpio440/direction           # Configure the IO direction as output:
echo 1 > /sys/class/gpio/gpio440/value                 # Illuminate the LED
echo 0 > /sys/class/gpio/gpio440/value                 # Turn off the LED
echo 440 > /sys/class/gpio/unexport                    # Release GPIO resources
Please note that these commands allow you to control and illuminate the onboard LED on the milk-v duo development board.
1.Implementing LED Blink Using a Shell Script:
The above commands allow you to control the on/off state of an LED in the bash shell. Now, let’s create a shell script to implement LED blinking based on the above commands.
Create a .sh file named led_blink.sh.
In the official image provided, use the built-in vi editor to enter the following code:
#!/bin/bash
LED=440
# Activate GPIO-LED
echo $LED > /sys/class/gpio/export
# Set GPIO-LED
echo out > /sys/class/gpio/gpio$LED/direction
# Loop 10 times: Turn on LED, delay for 1 second, turn off LED, delay for 1 second
for i in $(seq 1 30)
do
  echo 1 > /sys/class/gpio/gpio$LED/value
  sleep 0.4
  echo 0 > /sys/class/gpio/gpio$LED/value
  sleep 0.4
done
# Cleanup GPIO
echo $LED > /sys/class/gpio/unexport
After writing, save and exit (:wq). You can run the script directly: /root/led_blink.sh
If you want the LED to blink automatically after booting (as a system status indicator), you can use vi to add /root/led_blink.sh & to the /mnt/system/auto.sh script file, as shown below:

2.Implementing LED Blink Using Cross-Compiled C Language:
Enter the Duo system by running cat /proc/version

From this, it’s evident that the official Duo system image uses the riscv64-unknown-linux-musl-gcc compiler. (When compiling on the host, you must specify this compiler, or the compiled code won’t function on the target.)
Write C language code:
In the host Duo development environment, create the corresponding directory and write led_blink.c.
#include <stdio.h>
#include <stdlib.h>
#include <unistd.h>
#include <fcntl.h>
#include <sys/types.h>
#include <sys/stat.h>
#include <sys/ioctl.h>
#include <string.h>

// GPIO Pin Definitions
#define SYSFS_GPIO_EXPORT "/sys/class/gpio/export"
#define SYSFS_GPIO_UNEXPORT "/sys/class/gpio/unexport"
#define SYSFS_GPIO_RST_PIN_VAL "440"
#define SYSFS_GPIO_RST_DIR "/sys/class/gpio/gpio440/direction"
#define SYSFS_GPIO_RST_DIR_VAL "out"
#define SYSFS_GPIO_RST_VAL "/sys/class/gpio/gpio440/value"
#define SYSFS_GPIO_RST_VAL_H "1"
#define SYSFS_GPIO_RST_VAL_L "0"

int main()
{
    int fd;
    int count = 30;

    // Open the GPIO port: /sys/class/gpio# echo 440 > export
    fd = open(SYSFS_GPIO_EXPORT, O_WRONLY);
    if (fd == -1)
    {
        printf("Error: Failed to open export.\n");
        return EXIT_FAILURE;
    }
    write(fd, SYSFS_GPIO_RST_PIN_VAL, sizeof(SYSFS_GPIO_RST_PIN_VAL));
    close(fd);

    // Set the GPIO pin direction: /sys/class/gpio/gpio440# echo out > direction
    fd = open(SYSFS_GPIO_RST_DIR, O_WRONLY);
    if (fd == -1)
    {
        printf("Error: Failed to open direction.\n");
        return EXIT_FAILURE;
    }
    write(fd, SYSFS_GPIO_RST_DIR_VAL, sizeof(SYSFS_GPIO_RST_DIR_VAL));
    close(fd);

    // Output reset signal: Pull high >100ns
    fd = open(SYSFS_GPIO_RST_VAL, O_RDWR);
    if (fd == -1)
    {
        printf("Error: Failed to open GPIO.\n");
        return EXIT_FAILURE;
    }
    while (count)
    {
        count--;
        write(fd, SYSFS_GPIO_RST_VAL_H, sizeof(SYSFS_GPIO_RST_VAL_H));
        usleep(1000000);
        write(fd, SYSFS_GPIO_RST_VAL_L, sizeof(SYSFS_GPIO_RST_VAL_L));
        usleep(1000000);
    }
    close(fd);

    // Close the GPIO port: /sys/class/gpio# echo 440 > unexport
    fd = open(SYSFS_GPIO_UNEXPORT, O_WRONLY);
    if (fd == -1)
    {
        printf("Error: Failed to open unexport.\n");
        return EXIT_FAILURE;
    }
    write(fd, SYSFS_GPIO_RST_PIN_VAL, sizeof(SYSFS_GPIO_RST_PIN_VAL));
    close(fd);

    return 0;
}
To find the corresponding compiler on the host machine, run the following command: sudo find / -name "riscv64-unknown-linux-musl-gcc"

Compile to generate the executable file led_blink using the following command: sudo /home/jw/duo/cvi_mmf_sdk/host-tools/gcc/riscv64-linux-musl-x86_64/bin/riscv64-unknown-linux-musl-gcc -static -o led_blink led_blink.c
![]()
Transfer the led_blink executable file to the target machine using SSH. (Note: Your image must support RNDIS for this method to work. Official system images from milkv-duo-20230519-1809.img and later versions come with RNDIS functionality built-in.)
Run the following command to transfer the file: sudo scp ./led_blink root@192.168.42.1:/root/

On the target machine, grant execute permissions to the led_blink executable file and run the code.
3.Using the Pinpong Library in Duo Terminal to Implement LED Blinking in Python:
The following program is designed for use with the Duo-V1.0.4 image.
First, stop the built-in system indicator light on the development board:
mv /mnt/system/blink.sh /mnt/system/blink.sh_backup && sync
reboot
Edit the .py file for LED blinking using the following command: vi ./test_led.py
Enter the following code:
# Experiment: Control the on-board LED on the UNIHIKER board to blink once every second.
# Wiring: Connect a UNIHIKER main control board to a computer.
import time
from pinpong.board import Board, Pin

Board("MILKV-DUO").begin()  # Initialization, select the board type. If not specified, automatic recognition is performed.
led = Pin(Pin.D0, Pin.OUT)  # Initialize the pin as a digital output

while True:
    led.value(1)  # Set the output to high (LED ON)
    print("1")  # Print a message to the terminal
    time.sleep(0.5)  # Wait for 0.5 seconds to maintain the state
    led.value(0)  # Set the output to low (LED OFF)
    print("0")  # Print a message to the terminal
    time.sleep(0.5)  # Wait for 0.5 seconds to maintain the state
Run the Python program:
bashCopy code
python3 ./test_led.py
Section 6: Using the RJ45 Ethernet Port:
Tutorial on Milk-V Duo RJ45 Ethernet Expansion Board (spotpear.cn)
1.Solder the RJ45 Module to MILK-V DUO:

2.Configure Static IP in the Terminal:
Enter the following two commands:

ifconfig eth0 (Set your own IP address) netmask (Subnet mask)
route add default gw (Your route IP)
The static IP address range of the development board should match that of the router. For example, if the router’s IP is 192.168.0.1, only change the last digit from 1 to 2-255 (be careful not to conflict with other device IPs).
If there are no error messages after configuration, it means the configuration was successful.
(Note: After configuring the static IP, the router’s user list may not necessarily show the new device. To verify the configuration’s success, using an SSH client to log in is the most direct method.)
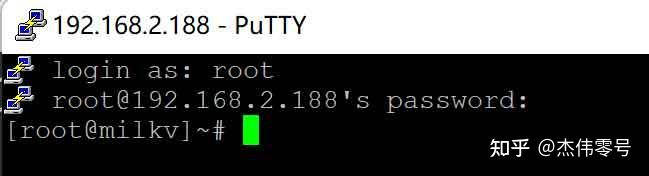
3.Access the System Using the Configured Static IP via the RJ45 Ethernet Port:
The static IP configured above is 192.168.2.188, and this tutorial uses IP 188 to log in to the device.
Users should log in based on their custom static IP.
(FAQ: Username is root, password is milkv)
Section 7: Using the Camera:
Tutorial on Milk-V Duo RJ45 Expansion Board (spotpear.cn)
Download Resources:
1.Ensure that you can SSH to the Duo device using USB networking (RNDIS).
The default firmware SSH username and password are root/milkv.
2.Download the test file package from the provided link:
3.Transfer it to Duo using SCP or any other method:
scp duo_camera_test_v0.2.tar.gz root@192.168.42.1:/root/
4.Execute the program:
Log in to the Duo terminal:
ssh root@192.168.42.1
Open the test package:
tar zxf duo_camera_test_v0.2.tar.gz -C /
Navigate to the test program directory:
cd /mnt/data/install/
Execute the test program to start streaming:
./CviIspTool.sh 64M
Under normal circumstances, the terminal will display the following log at the end:
VPSS init with src (1920, 1080) dst (1920, 1080).
CVI_VPSS_CreateGrp:0, s32Ret=0
rtsp://127.0.1.1:8554/stream0
prio:0
CVI_RTSP_SERVICE_CreateFromJsonFile[./cfg_64M.json]
[REMOTE] cvi_raw_dump_run,158: raw dump ready...
waiting for connect...
5.Play the video with VLC Media Player:
Replace the IP in links starting with “rtsp:” with the Duo’s IP address. This will be the streaming address used in the VLC Media Player.
For example:
rtsp://192.168.42.1:8554/stream0
Click “Play,” and you will be able to view the video stream from the camera.
Effect:

Section 8:Enabling Virtual Memory:
Luckfox Pico RV1103 (spotpear.cn)
Virtual memory is a technology within the operating system used to expand the capacity of a computer’s physical memory (RAM). It accomplishes this by storing a portion of data on disk and loading active data from the disk into memory to meet the memory needs of processes.
1.Virtual memory offers the following advantages:
Expanding Memory Capacity: Virtual memory allows the operating system to extend the usable memory capacity when physical memory is insufficient. It moves less frequently used data to a swap file on the disk to free up memory for other processes.
Enabling Concurrent Program Execution: Virtual memory makes it possible to run multiple programs simultaneously. Each program is allocated a portion of virtual memory, even if physical memory cannot accommodate the data of all programs simultaneously. This allows for switching between programs’ memory usage by swapping data to the disk.
Providing a Larger Address Space: Virtual memory enables each process to access a larger address space, exceeding the limitations of physical memory. Processes can perceive a contiguous block of memory while their data may be distributed across physical memory and the disk.
Improved Memory Management: Virtual memory automatically manages memory paging (dividing memory into fixed-size pages), offers memory protection (preventing processes from accessing memory out of bounds), and implements mechanisms for memory sharing and memory mapping, among others.
Virtual memory provides significant advantages in memory extension and multitasking but also introduces performance overhead and added complexity. In modern computer systems, virtual memory is an indispensable component widely used in various operating systems.
2.Enabling Virtual Memory in Milk-V Duo:
Before using it, make sure that Milk-V Duo is using the system image Duo-V1.0.4 (Extraction Code: jwz0) or above.
Enter the following commands in the terminal:
mkswap /dev/mmcblk0p3
swapon /dev/mmcblk0p3
Use free -h to check if virtual memory is enabled.
